Route schedule: Rise, Breakfast, Camp gathering, Movement, Lunch, Movement, Setting up camp, Dinner, Water supply for the next day, Hang up.
Climb.TO Attendants are appointed every day. The attendants prepare dinner, breakfast and lunch.
The attendants are the first to get up, prepare breakfast, wake up the whole group.
The time from getting up to going out for good groups should not exceed 2 hours.
Movement. The transition is the first, before lunch is 2/3 of the entire day's journey. In duration, it is approximately 4-5 maybe 6 hours. Usually, if the exit is at 9, then they get to lunch somewhere at 13-14 o'clock. But in general, going out at 9 is late, for good it is necessary to go out at 7, then lunch will be at 12 o'clock. The body is maximally ready for stress before lunch.
Lunch break. Duration 2-3 hours.
Evening walk. 3-4 hours.
Camp setting. The camp is set up at about 5-6 o'clock.
General rules for bandaging. Use of tubular-mesh bandages.
Bandages are:
Integumentary (to hold a sterile napkin lying on the wound)
Pressive (to stop bleeding)
Immobilizing (to achieve immobility of the site) (gypsum, tires).
Bandages are the most widely used. General principles
It is superimposed firmly, should not slip off, but also should not press and cause mechanical damage to the skin
The part to be dressed must be exposed and easily accessible for dressing.
You need to bandage according to the rules, using any standard bandage.
Bandage rules:
During dressing, it is necessary to stand facing the patient (it is convenient if the part to be bandaged is at the chest level of the bandager)
When bandaging, it is necessary to talk with the patient, which allows monitor the patient's condition, do not cause new pain sensations.
Make sure that the part of the body being bandaged is in the correct position.
The direction of the turns should be the same in all layers of the dressing.
The width of the bandage is equal to or greater than the diameter of the bandaged part.
The bandage is held in the hand so that the free end is perpendicular to the hand in which the roll of the bandage is located.
Bandage from narrow to wide place.
At the beginning of the dressing, a “lock” is made.
The amount of bandage that is needed is applied.
Ticket 19
Search and Rescue Services (PSS). Interaction of tourist groups with PSS. The presence of PSS in the area of UTP.
Increasing the safety of competitions is ensured by interaction with rescue services, insurance companies, state and public organizations on the territory of which the route passes.
The means of accounting, control and interaction is the route book (route sheet).
50.2. Group passing through the territory Russian Federation, must be registered with the relevant rescue service in the region of the route.
50.3. Registration procedure. After receiving permission to enter the route, the leader, no later than a week before leaving the route, informs the rescue service of the region where the route passes about the route and the composition of the group (the application form is given in Appendix 9, section 1 of the Regulations).
50.4. The group needs to have technical means of communication according to clause 49.4.
50.5. In accordance with the Regulations on the competition, the participants of the group and the head of the group must insure themselves against an accident.
50.6. If necessary, the group goes to the nearest medical facility in settlements route area.
50.7. In case of failure to receive a message from the group about the completion of the route within the deadline, the GSK takes all possible measures to find out the reasons and, if necessary, applies to the rescue service.
Increasing the safety of the trip is ensured by interaction with rescue services. The means of accounting, control and interaction is the route book (route sheet).
A group passing the route through the territory of the Russian Federation must be registered with the relevant rescue service in the region of the route.
When making a route abroad, groups are registered with local authorities (including the rescue service, if any) in accordance with the rules in force in the state on whose territory the route passes.
Registration procedure. After receiving permission to enter the route, the leader, no later than a week before leaving the route, informs the rescue service of the region where the route passes about the route and the composition of the group.
When passing the route, the leader informs the State Investigative Committee, the IWC and the regional rescue service about the exit and the completion of the route by telegram, by phone, e-mail or in person.
In accordance with the Regulations on the competition, the participants of the group and the head of the group must insure themselves against an accident.
If necessary, the group applies to the nearest medical institution in the settlements of the area of the route.
In case of failure to receive a message from the group about the completion of the route within the deadline, the GSK takes all possible measures to find out the reasons and, if necessary, applies to the rescue service.
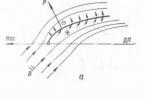
Dangers of grassy and scree slopes. Technique of movement and ensuring safety when driving on them.
Dangers of grassy slopes.
wet slopes
snowy slopes
icy slopes
shrubbery
slopes under crumbling rocks
slopes under "live" scree
slopes over cliffs (rocks, "ram's foreheads")
Technique Using natural bumps (bumps, stones) to set the foot horizontally for greater stability and smoothness of movement. The torso must remain vertical. Setting the feet and legs depending on the slope:
parallel to the entire sole (up, down and traverse with a small slope)
on the rise (toes outward on the inner welt with a significant slope - facing the slope)
on the welts (on the outer “upper” leg and the inner one on the “lower”) on the traverse
downhill (bending the knee of the "upper" leg - sideways to the slope, changing legs)
greater risk of slipping of the "upper" leg, standing on the outer welt
Driving direction (most safe):
straight up (steep slopes, short cut)
straight down (gentle slopes, short cut)
ascending traverse (when climbing on gentle slopes)
descending traverse (when dropping on gentle slopes, sideways down on steep slopes)
serpentine up (bumpy slopes)
Belay and self-belay: using an alpenstock/ice ax while moving, while self-holding - using natural terrain irregularities
Scree classification: by the size of the stones (small, medium, large), by mobility ("live", old, caked) dangers
sliding down the slope
surface screes on rock slabs and inclined shelves
damage to the joints when the limbs hit during movement in the gap between the stones
the presence of rockfall - a source of fresh scree
high mobility (flowability) of conglomerate slopes of moraines
Technique It is necessary to take into account the presence of a source of scree (rockfall) and the size of the alluvial cone. Moving along a small scree is like moving along a snowy slope. Including, in terms of trampling steps. Setting feet on at least two stones at the same time! Scree movement:
on a shallow slope - straight up
on a shallow steep - traverse / serpentine
along a large old flat / horizontal - either in a compact group (step by step), or maintaining an interval of at least 5 meters to prevent the consequences of large block movements
on a large moving steep - traverse one at a time with the deployment of observers
on the middle - combining techniques
by "live" - warning about the presence of each "live" stone
on a moving shallow one - sliding down one by one along with scree
Belay and self-insurance Self-insurance on a small scree is similar to that on a snowy slope. It is possible to hang railings on steep conglomerate slopes. When driving along the "live" scree and under the source of scree, you must wear helmets!
Methods and rules for applying a tourniquet.
Rules:
The tourniquet is applied over clothing or a towel, a scarf, a piece of gauze are placed under it.
The tourniquet is applied with sufficient force to stop arterial bleeding (If the tourniquet is applied correctly, bleeding stops, the pulse at the wrist and foot disappears, the limbs turn pale)
It is necessary to control the bleeding
The tourniquet is not applied to the damaged area (abrasions, wounds, sprains, dislocations), to the main site of the wound)
After applying a tourniquet, it is necessary to treat the wound, apply a pressure bandage
After half an hour, check to stop the bleeding (release the tourniquet and see if the blood comes through the bandage)
If the bleeding has not stopped, repeat the application of the tourniquet (again, if possible, the tourniquet is applied higher)
Do not cover the applied tourniquet with clothing.
Place a note under the tourniquet indicating the time of application.
The tourniquet is not applied: in the middle of the shoulder, in the lower third of the ankle)
Deliver immediately to a medical facility
With a delay in hospitalization, every 2 hours in the warm season and every half hour in winter, loosen the tourniquet. If this is not done, necrosis of the limb may occur.
Errors when applying a tourniquet:
If applied too weakly - bleeding increases, if too strongly - it can cause damage to the nerve trunks, when applied directly to the skin - sharp pains (usually 40-60 minutes after application)
Ticket 20
Classification requirements for tourist route 1 k.s.
Table 2.
|
Routes by type of tourism | ||||||
Table 3
Classification requirements for the tourist route 2 k.s.
Requirements for the duration and length of categorical routes are given in Table 2
Table 2.
|
Routes by type of tourism | ||||||
|
Route duration in days (at least) |
||||||
|
Route length in km (at least): |
||||||
The main part of the route must be linear or circular (one ring) with a length of at least 75% of the difficulty set for this category and contain the most difficult obstacles of the route (for example, for mountain routes - at least two of the most difficult passes).
Table 3
|
The minimum number of category drugs (PP) |
|||||||
Methods and rules for applying tires.
A tire is a solid pad. The splint bandage consists of a splint, a soft pad and a bandage. Most often, cotton wool is used as a soft pad.
Target splinting - ensuring immobilization (immobility) of a limb or body part.
Basic principles of proper splinting:
Before applying a splint, look for wounds in this place
When applying a splint, leave the injured area in the position in which it was found.
The splint should cover two joints adjacent to the fracture.
The tire should not come into direct contact with the skin anywhere, especially in those places where the bones are located close to the surface of the body.
It is better to apply tires on the sides of the limb, less convenient - on the front or back sides of the limb.
There should always be a soft pad under the tire.
The tire is carefully bandaged to the immobilized part of the body so that it cannot move.
Apply the bandage not too tight so as not to interfere with normal blood circulation. Make sure that the fingers of the affected limb are not swollen, blue, or numb.
Special cases of fractures.
For damage in the area shoulder joint(collarbone, scapula, head of the humerus): bandage the arm correctly bent at the elbow to the body, or put a splint on the shoulder and forearm. For damage in elbow joint area and the forearm splint is superimposed on the shoulder and forearm (a special splint is on the outside, wooden splints - one on the inside between the shoulder and the body, the other on the forearm from below - should be well fastened above the elbow joint. Then the arm is hung on a scarf.
When damaged forearms and hands wooden tires are superimposed on the palmar surface. Next, the hand is hung on a scarf.
Splint bandages on lower limb with a hip fracture: to the armpit from the outside, to the groin from the inside.
Splint bandages in case of damage cervical spine and head: either specialized tires, or, for example, two heavy bags with a bag, which are placed on both sides of the patient's head, lying supine.
Pr fracture ribs- tighten the chest with a bandage or towel.
Ticket 21
3. Basic principles of first aid.
Basic commandments
Do no harm. (including inactivity)
The specialist should treat. Our task is to provide first aid, to convey to the doctors. (The diagnosis is preliminary, all doubts are in favor of the patient)
Prevention is better than cure.
Principles:
Correctness (should be done or not)
Expediency
Fast (no fuss)
care
Deliberation
Decisiveness and calmness.
First aid algorithm:
In terms of safety (avalanches, rocks, cornices)
In terms of injury severity
Assessment of the situation
Measures to eliminate the damaging factor
Assessment of the victim's condition (examination, interview)
First aid
Stop bleeding
Restoration of impaired breathing
The introduction of drugs
Anesthesia
Breathing stimulation
Injection (or other anesthesia (lidocaine spray, cold)) of the injury zone.
immobilization
In case of emergency - withdrawal from it
Primary resuscitation (artificial respiration, chest compressions)
Elimination of local pain factor
Giving the victim a comfortable position and thermal comfort.
Prompt delivery to a medical facility.
Principles (Taken from another source)
Do not move a seriously injured person
Do not give food or water unless you are sure
Do not engage in activities that block the airway (do not lay flat, do not put a pillow under your head.
Keep your cool
If necessary, call an ambulance immediately
Quickly assess the situation and follow the sequence of actions.
Do no harm
Focus on the person, not just the symptoms
(S. N. Boldyrev)
The distance covered by tourists per day, as well as the weight load, is difficult to accurately pre-ration. It is determined primarily by the difficulties of the route and the weight of the backpack.
Healthy people with medium-weight backpacks walk 20-25 km a day across the plain. In the first days of travel with heavy backpacks, they overcome in the valleys of the mountains, on the approaches to the passes 15-18 km per day, in the taiga, over rough terrain - about 12 km. With lightweight backpacks in the mountains and taiga, tourists who are drawn into hiking life walk 18-20 km, and on descents along trails up to 30 km. In one-day hikes with light backpacks, beginners cover 15-20 km, and trained tourists - up to 30 km.
The duration and distribution of running time during the day are of great importance for creating rhythm in the alternation of loads and rest.
The movement takes place at the least hot time - at the beginning and end of the day, and a large running load should fall on its first half. Sufficient rest is organized in the middle of the day.
It is necessary to set up an evening bivouac in the summer before dark. It is better to get up earlier than to go to bed late, as there is more light and coolness in the morning.
In hikes of medium difficulty, meals, rest and running time are distributed approximately as follows: rise - at 7 o'clock (at 5-6 o'clock) *; toilet, exercise, breakfast - up to 9 hours (up to 7-8 hours); movement - up to 13 hours (up to 11-12 hours); lunch, rest, gathering - until 15.30 (until 16:00); movement - up to 19 hours (up to 18-19 hours); setting up a bivouac, dinner - until 22:00 (until 20-21:00).
* In parentheses are the times on hot days.
IN mountain hikes the approximate daily routine is as follows: rise - at 5-6 o'clock (at 3-4 o'clock) **; toilet, exercise, breakfast - up to 6-7 hours (up to 4-5 hours); movement - up to 11-12 hours (up to 9-10 hours or until the dangerous section on the pass or approaches to it is passed); lunch, rest, gathering - until 13.30-14.30 (when crossing the pass - depending on the circumstances); movement - until 18-19 hours (preferably until 19-20 hours), lights out - at 20-21 hours (at 19 hours).
** The time given in parentheses is subject to the passage through the pass.
Every 50 minutes of movement is followed by a 10-minute rest. After the third transition, rest 20 minutes. At the beginning of the movement, the pace is somewhat slow. After 15-20 minutes after the start of the movement, it is useful to stop for 5 minutes to finally put the equipment in order.
In the mountains on the slopes, the load is reduced by slowing down the speed. If the slope is particularly steep, rest can be given after 20, 30 and 40 minutes of movement (depending on the difficulty of the path and the physical condition of the participants).
If there are serious obstacles that require considerable time to overcome them (alpine zone and taiga), the normal rhythm in the alternation of work and rest may be disturbed: in such cases, the passage of rock-fall hazardous places will have to be started at dawn and even at night, and the movement should be continued even during the hottest hours day. Sometimes no more than 1 or 1.5 hours are allocated for lunch.
For trained tourists, the forced disruption of the rhythm, temporary overload of the body does not threaten any serious consequences and is compensated by additional rest.
To make up for a possible lack of rest, when compiling the route, days are usually planned: the first - 3 days after the start of the trip, the second - in the second half of it.
If there are less trained tourists in the group, day trips are scheduled every 3 days. In general, the entire field life of the team must be built on the basis of the capabilities of the weakest. There is no misfortune in this. It is only necessary to distribute all the loads according to the strength of each and to ensure comradely mutual assistance in the collective.
The mode and daily routine are determined even when developing the route and schedule of the campaign, it is one of the decisive conditions for the fulfillment of the intended goals and active rest students.
The movement is recommended to start as early as possible. In 10-12 minutes after leaving the camp, in order to check and adjust equipment, shoes and clothes, it is necessary to make the first halt (stop). Subsequent small halts (10 minutes) are made every 50 minutes of movement, passing about 4 km of the way. After 3-4 hours of movement, tourists stop for a day's rest and lunch. According to the distribution of responsibilities, students begin to set up a temporary camp and prepare lunch. Having quickly set up tents and laid out things, students come to the pond in an organized manner under the guidance of an instructor. After checking the place for swimming, the instructor instructs the children on the rules of behavior on the water, counting them and dividing them into pairs (this allows students to control each other).
After lunch, students prepare for the tourism competition between teams.
Approximate competition program
1. Theoretical questions on tourism.
2. Setting up the tent.
3. Breeding a fire.
4. Providing first aid.
5. Competition in overcoming the tourist obstacle course.
Description of stages and their equipment
1. Start and finish - combined and equipped with three flags 150 cm high and banners "start" and "finish".
2. "Setting up the tent" - a flat area (5 × 7), preferably with soft ground and grass cover.
3. "Grenade Throwing" - from the line marked with two flags at a distance of 15-17 m, a "window" measuring 150 × 250 cm 20-25 cm deep is equipped. If it is not possible to dig a window, it can be marked with four flags.
4. "Pendulum". A rope with a diameter of 15-40 mm is tied to a thick branch of a tree at a height of 3-5 m, the free end of the rope should not reach the ground 25-30 cm. On the ground (if there is no natural obstacle), two parallel lines indicate the distance to be overcome.
5. "Bumps". In the zone of the "bumps" stage (3x10 m), 15-20 chocks 15 cm long are buried in disorder so that they protrude 3-4 cm above the ground.
6. "Log". At a distance of 5-6 meters, two small logs are buried so that their height is 50-60 cm above the ground. A third log with a diameter of 25-30 cm is attached to them from above. For safety, a rope or a thick rope is pulled nearby.
7. "Mousetrap". At a distance of 5 m, 8-10 stakes are hammered and connected with a rope, forming a rare mesh.
8. "Carrying the victim." Carry the victim together.
Distance Rules Between Stages
There are 11 participants (7 boys and 4 girls).
Stage I - 4 people (2 boys and 2 girls).
II-VII stage for one person. The “bump” stage is overcome by a girl.
Stage VIII - 3 people (2 boys and 1 girl).
Distance: start - I stage (6 m).
I-II stage (10 m), II-III stage (10 m)
III-IV stage (10 m), IV-V stage (5 m)
V-VI stage (10 m), VI-VII stages (15 m)
VII-VIII stages (10 m), VIII stage - finish (10 m)
After the results of the competition, students have lunch, put their tourist equipment in order and rent a tent camp. After checking the presence of students and the serviceability of tourist equipment, the tourists set out on their way back.
When conducting a two-day hike with an overnight stay, the regime and routine change. More time is devoted to small excursions, to friendly matches in sports games with neighboring camps or with local schoolchildren, to meetings with war and labor veterans. Particular attention should be paid to the choice of a place to spend the night: convenience of location, availability of fuel, good condition of the place, etc. Night duty is necessarily organized. On duty for one hour 1 adult and 3 students. Competitions, games and attractions are held between breakfast and lunch. After a short afternoon rest, the students set off on their return journey.
After returning, it is desirable to organize an exhibition at which maps, hiking routes, photographs, collected collections, etc. would be exhibited.
The successful passage of the route depends not only on the group itself, its strength, discipline, cohesion, but also on the season, weather, path conditions, unforeseen obstacles and other external circumstances that do not depend on the tourist. There are so many of them and they are so diverse that it is far from every day that one succeeds in observing a typical, once-for-all established routine, but for the most part one has to adapt it to these circumstances. However, any routine should be based on the following mandatory starting points:
1) if the group is not out of schedule, it spends no more than 6-7 hours daily on the route;
2) setting up camp for the night, preparing dinner and dinner ends no later than after dark;
3) on night rest take at least 8 hours.
All this can be easily done in good weather. summer time, but in bad weather and in autumn, when the day is noticeably shorter every day, it requires mobility and efficiency. Practice has established the following general rules:
1) rise, toilet, cleaning of beds and personal belongings in all cases is carried out as early as possible, and in the south and in hot weather - before dawn, in order to capture more cool morning minutes for movement. The requirement to let "sleep off" can be satisfied by a planned half-day or by going to bed earlier, but without transferring the rise to later hours;
2) breakfast (necessarily hot, with an unlimited amount of tea or coffee, 35% of the daily ration) must be ready and served no later than half an hour after getting up. In bad weather, food is prepared under cover, and eaten in tents or under a common tent (p. 182). To prepare breakfast, the attendants get up an hour and a half earlier than the group, and fuel and provisions are prepared in the evening;
3) loading and dumping are carried out immediately after breakfast; all responsibilities for folding the camp, cleaning the parking lot from traces of stay, carrying ships should be clearly distributed. Often, kayakers are delayed with a blade due to the repair of shells damaged the day before. This operation must be done either in the evening, immediately after going ashore, or before the general rise. In bad weather, the group rolls off as soon as the rain stops and the navigator of the group reports that the state of cloudiness allows us to hope for an improvement in the weather;
4) a daytime halt on the shore is arranged in clear summer weather in the afternoon with a full meal (40% of the daily diet) and a general rest lying down for 1-1.5 hours until the heat subsides (swimming - before dinner). In unstable weather, if you are late with the exit and during periods of a short day, instead of a major lunch break, you get by with a “snack” (sausage, canned food, a second course stored in advance and warmed up, hot drinks). Afternoon rest is reduced to half an hour or completely canceled depending on the circumstances;
5) in the middle latitudes for dinner and overnight, the group in all cases stops no later than 45-60 minutes before sunset, and in the north and in the Arctic during periods of white nights - about 19 hours. In places poor in good camping, the group sets up camp at the first suitable site after 18 hours, since the search best place can drag on until dark and lead to overnight stays in worse conditions. Dinner - 25% of the daily ration;
6) going to bed in all cases is carried out 8 hours before the appointed time of rise. A bonfire with songs is possible only on the eve of the day or, if there is free time, after dinner, until lights out.
class="subtitle">What is a hike?
Hiking is a journey through wild nature. Traveling on your own and with the help of a team of like-minded people who, just like you, want adventure, a bit of extreme sports, beautiful landscapes, live communication, a hot fire in the evening and a beautiful sunrise in the morning.
We are well aware that you may not have the experience of such trips, so even at the stage of preparations we will help you with the preparation of the necessary set of hiking equipment and help you resolve any issues that have arisen.
Start of the hike
The campaign begins with the gathering of the group in the starting city. You arrive at the starting point, meet with the rest of the participants of the hike and your instructor, whose contacts we inform you in advance. Here you are given a package with part of the camp food, as well as public equipment (group things like cauldrons or first aid kit). The weight of food and equipment is distributed depending on the age and gender of the participant. For example, a healthy man will not be trusted to carry a pack of crackers. Just like a fragile girl - two tents and food for three days. As a result, the approximate weight of a men's backpack is 20 kg, women's - up to 15 kg.
After getting ready at the station, the group boards a motor vehicle, which brings you to the immediate starting point of the hike. Further - only on foot.
The first day of the hike is the hardest.. Each group has different participants: both hardy men who professionally played sports or went hiking before, and people who are used to more passive recreation. The vast majority of the participants later admitted that it was very difficult to walk on the first day. Walking is unusual, backpacks at the beginning of the trip weigh a lot, and it just might be that someone packed or adjusted it incorrectly. This must be overcome. Already by the third day, the muscles will work at 100%, strength and lightness will appear in the body, and by the end of the trip you will no longer feel the backpack on your back.
With this in mind, for the first few days of the hike, a gentle mode of passage is usually planned so that you adapt to the new load and feel the beauty of the wild places.
Other hiking days
All hiking days will be different. On the one hand, the route is built in such a way as to show you more natural beauties, and on the other hand, the weather makes its own adjustments to the calm course of the campaign. Canyons and plains, cliffs and forests, rain, sun, wind and hot heat - all this combined will create many, many special hiking days in their own way. Moreover, one and the same route, even if you walk along the same paths, is constantly seen in different ways.
By the way, about trails. Everywhere - in the Carpathians, Turkey, Georgia - there are well-known, hundreds of times passed tourist routes. But often there are alternative, less traveled options for getting from point "A" to point "B". Which way you go depends on the instructor - after all, he also wants to discover something new in every trip, and he will gladly share the adventure with you.
You will have simple days - walk and take pictures. There will be more difficult days when you will need to walk along the bottom of the canyon, or on rocky plateaus. There will be difficult days - when you climb some peak or when you have to overcome difficult mountainous terrain. In any case, the more contrast and emotional the day passes, the more vivid impressions, memories and photographs you will have from the hike.
A few words about overnight stays.
On summer hikes (by summer we mean those without snow) you will sleep in tents and cook food on a fire. Any overnight stay has three essential components: a nice place for parking, a spring or a well with water and the nearest forest for collecting firewood. Thanks to this, in the evening you can wash, cook a hot dinner, sleep and gain strength before a new day.
You will set up tents, make a fire, cook dinner with the instructor.
Of course, there are hikes like Cappadocia, where it doesn’t seem to be winter - but you will live in hotels, going out to different places every day. Here, of course, no fires - only local restaurants with delicious authentic food.
Breakfast on the hike

The food on the hike is divided into three parts. It is not difficult to guess that this is breakfast, lunch and dinner - a time when you can relax and gain strength.
So let's start with breakfast.. The attendants prepare it. They get up a little earlier than everyone else, make a fire and cook breakfast. Making a fire is interesting and exciting for many, so we will agree on who will get up a little earlier than the rest in the evening.
After making morning tea / coffee, the attendants wake up the group, have breakfast together, pack up the camp and go on the route.
Lunch and breaks on the hike
There are regular breaks between breakfast and lunch. It is clear that people need and it is important to rest, therefore, from time to time, on halts, the group eats the so-called " mating"- high-calorie snacks (nuts, dried fruits, sweets), which give strength to further promotion.
Lunch is around 2-3pm.. In general, lunch is a big halt, the only difference is that it lasts about an hour, and the products for lunch are more solid: not nuts, sweets and seeds, but, say, sandwiches with sausage or pate and sardines in tomato.
In general, lunch and halts are an additional opportunity to calmly, without physical exertion, communicate and contemplate the nature around.
Dinner on the trip

They start looking for a parking place by 5-6 pm. Usually by this time the group has already arrived at the planned place to spend the night. For dinner, as before, a camp is set up, a fire and food are organized. In the evening we will cook together: it is much easier and faster to cook food with the whole group. The rule about "seven nannies ..." does not work here - the more people are involved in cooking camping borscht, the tastier it turns out in the end :)
Dinner is not only a time for food, but also a time for evening gatherings around the fire. It doesn’t matter here whether you have a guitar with you or not - you can sing songs around the fire and tell jokes.
And yet, it is at dinner, over a cup of tea, that the instructor will tell you about the plans for tomorrow.