How to weave a net?


Fishermen sometimes use nets to catch fish. It is not necessary to buy a network in a store; you can make it yourself. Previously, every fishing lover knew how to do it. The method of weaving cells is simple, if you have the necessary tools at hand. It will take a lot of perseverance and patience, as this is quite painstaking work. In this article we will look at how to weave a network.
Materials and tools for weaving
In order to weave a high-quality net that can withstand mining and exposure to water, you should choose a durable material. It could be:
- nylon or nylon thread;
- fishing line;
- regular sewing thread of a dark color, which should be strong and thick.
In addition to the material, you will need the following tools:
- shuttle - a device with which the weaving process takes place;
- bar - a ruler measuring the size of the cell.
If it is not possible to purchase a shuttle in a store, it can be cut from a thin sheet of plastic, wood or metal. It should be slightly smaller than the bar in order to pass freely through the network cells. You can use a piece of ruler, wood, or plastic as a bar. Before weaving nets for fishing, you need to wind a fishing line or thread onto the shuttle.
Net weaving process
When everything is prepared for work, you can begin to create fishing tackle.

You can read about how to weave a network in the simplest way in the article.
In the life of a hermit, fishing plays a big role, since fishing is practically the most accessible way of obtaining food in natural conditions. Fishing with nets is a very effective way of catching fish, and does not require the personal presence of the fisherman when fishing, which means more time for doing other things affairs.
Fishing with nets has been known since ancient times as a very effective, mass catch of fish. There are many varieties of nets, but the main ones are simple single-walled nets in an “oblique” mesh. Weaving fishing nets is an ancient craft that is still alive today, since Fishing is still practiced today, but now factory nets are mainly used, and only a few are engaged in knitting nets.
Basically, fishermen are only engaged in repairing nets and re-equipping, improving factory nets for certain fishing conditions, this is mainly adding weights and floats for installing nets in various reservoirs with different currents and depths.
For a hermit, knitting nets, scarves, can be an excellent replacement for factory nets, since knitting is much cheaper than buying new nets, and knitting is also a useful pastime on long winter evenings. Knitting nets is a fairly simple craft that does not require any special knowledge or means for knitting, the costs are only for thread or forest, which means they are minimal. The simplest method of knitting a fishing net is described in detail below.
INDEPENDENT KNITTING AND EQUIPING A FISHING NET
To knit a network, you need thin threads or fishing line, as well as a “shuttle”, a shuttle is a needle with which the fabric of the network is made, and a bar, a bar is a ruler that is selected in accordance with the pitch of the cell, that is, if you need a network “ forty", then the width of the strip is 40mm.
To weave a net, in addition to fishing line and special threads, in the absence of them, you can also use ordinary sewing thread, which is found in every home (if you use it, then black is better - it is stronger). A hook for knitting can be purchased in fishing stores, but in a hermitage these are the possibilities It may not be, and I gave a couple of ways to make your own shuttle for knitting a fishing net.
MANUFACTURING THE SHUTTLE
The shuttle can be made from various materials, for example, wood, plastic, metal, etc. The simplest shuttle can be cut from a flat sheet of plastic. The thickness of the plastic sheet should be 2-3 mm in order to be as thick as possible. Next, a blank is drawn on the sheet and carefully so that the plastic does not crack, it is sawed out or cut out, and the inner part is cut out with a chisel, flat screwdriver, knife, etc.
The dimensions of the shuttle are 3 cm wide and about 20-25 cm long. The width of the shuttle should be slightly less than the bar in order to pass freely between the meshes of the net; if you need to knit a net with small cells, then you need a smaller shuttle, for example a 25mm mesh .,and the shuttle is 20-18mm.
After the workpiece has been spooled, it must be carefully sanded to remove any irregularities and snags so that the fishing line does not cling to the edges of the shuttle; this can be done with sandpaper, a file, a knife, etc. After the shuttle is ready, you need to wind a supply of fishing line onto it, winding alternately several turns on each side of the shuttle, placing the thread on the middle protrusions of the shuttle.


THE SAME SHUTTLE CAN BE MADE
For example, from a galvanized sheet, for this, a template is also drawn on the sheet and cut out with a metal shear, or cut out with large scissors, or metal scissors, and the internal hole can be punched in diameter with a beard, a nail, or a screwdriver. After the workpiece is cut, it needs carefully sand with a file so that the ribs are absolutely smooth, so that the fishing line does not cling to the edges of the shuttle. And then a supply of thread or fishing line is wound onto it as in the first option.


PLANK
As a bar, you can use a simple ruler, or anything suitable, or cut a strip of plywood or plastic tin. The width of the bar should be no more than 3-3.5 mm in order for the knots to be tightened well.
STEP-BY-STEP INSTRUCTIONS FOR KNITTING A MESH FABRIC
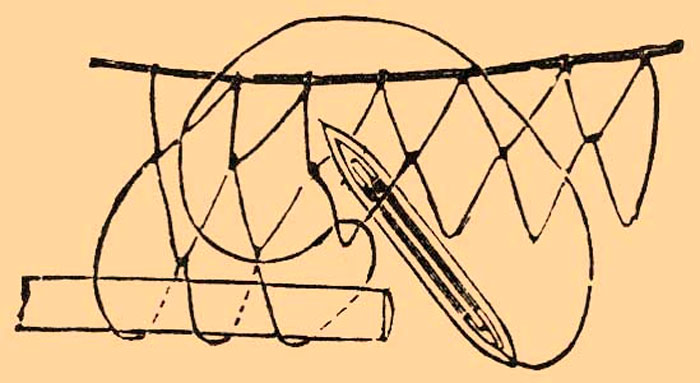
First, somewhere in a convenient place, a rope or wire in the form of a ring is tied, you sit down on a chair next to you, since the work is long and painstaking, pull the ring towards you and make a loop about 5 cm long through the wire, and attach a bar to the resulting knot from below (photo. 1), then make a turn of the thread with the shuttle down under the bar, bringing the shuttle up through the ring, pull the thread, and pinch the thread with your finger (photo 2), tie the resulting loop with a knot (see figure).
Next, again make a turn down through the bar, and bring the thread through the wire and again hold the thread with your finger on the bar, tighten the knot by releasing your finger (photo 3), thus casting on the required number of loops for the width of the net, and remove the bar.
After this, you get a series of free loops on the wire (photo 5). Then you pull the thread and put the bar under the thread, turn the shuttle down around the bar, grabbing the cell, pull the thread and hold it with your finger (photo 6) then use the shuttle to knit a knot (see fig.) and tighten it.
Then again, through the bar from under the bottom, grab the next loop with a shuttle and pull it, holding the thread with your finger, knit a knot and tighten it. Thus, loop by loop you get cells, knit a row to the last cell and take out the bar, then it should turn out like this (photo 9) .
Next, stretch the thread in the same way and apply a bar from under the bottom and, diving with the shuttle down, bring it through the cell to the top, pulling and pinching the thread on the bar with your finger. After knitting a row, remove the bar and again pulling the thread and tightening the knots, knit row by row until you need long After the fabric is knitted, it needs to be rigged, that is, threads are passed along the edges and floats and sinkers are tied onto them.
It is believed that the net is not a sporting tackle, but sometimes it is difficult to do without it, and many anglers use it successfully, and many do not mind learning how to make it at home. Fishermen use nets while allowing commercial fishing in the seas and rivers. The net is also used in regions where fish is the staple food. These are remote villages where fish are caught with nets even in winter. Naturally, in such cases no one thinks about fishing with a feeder.

In order to connect the network, special tools are needed. As a rule, the grids are different and differ in the width of the cells. It all depends on how large the fish you intend to catch. The size of the cells is formed by the bar, which is an integral part of the knitting tool. The width of the bar used determines the dimensions of the meshes of the fishing net.
The second part of the tool is a shuttle, which is not difficult to make yourself or, in extreme cases, purchase at a store that sells fishing accessories. It should be noted right away that the bar and shuttle are made for a specific cell size of the future network. A smaller shuttle can be used to weave nets with large cells (but the bar must be of the appropriate size), but nets with smaller cells cannot be used, since the shuttle simply will not fit into a cell smaller than itself.
The shuttle is designed to wrap material around it and use it to tie knots. The material you can use is cord or monofilament fishing line. It is clear that a lot of material will be required to make the net, and therefore the material will be required in reels. The thinner the line, the more catchy the net, because such a net is hardly noticeable in the water. Color does not play a major role, since at a depth of 5 meters the fish does not distinguish color. A fishing line net has a number of advantages over nets made from other materials. It does not rot, dries very quickly and is more durable. The knots that are used when knitting nets can be different. When using fishing line as a working material, a double clew knot is used.
Look at the video on how to weave such knots:
Uni Line (chameleon) fishing line from the Japanese company Momoi Fishing is widely used for these purposes. This fishing line has a unique coating that makes it virtually invisible in water. The nets woven by the Chameleon are more catchy.
Net fabrics made from fishing line are called “dolls” and are widely used in the national economy.
Shape and size
Networks come in various forms:
- Single-walled. The simplest form and has upper and lower selections. These selections are attached to the cores, which are located on both sides of the network. The height of the veins is 20 percent less than the network.
- Two- or three-walled. Complex shaped networks called tangles. This is due to the fact that the fish get entangled in it.
The length of the networks can also vary and can range from 20 meters or more. The height of the nets (for industrial fishing) ranges from 1.5-1.8 meters. Accordingly, the nets also have different cell sizes depending on the size and size of the fish:
- 20mm – for live bait and small fishing;
- 27-32mm – for roach and perch;
- 40-50mm – for bream and crucian carp;
- 120-140mm – for trophy pike.
Landing
First, the main part of the network, called del, is woven. From such individual pieces, a large network is assembled, which, in turn, is fixed to a more durable base, which is used as a braided cord or strong rope. This technological operation is called “planting”. The fit could be 1:2, 1:3 or perhaps 1:15. Delhi can be purchased in a store and “planted” at home, which, by the way, many do. At the moment, Finnish and Russian ones are considered the best deals.
To “land” the network yourself, you need to mark the cord and calculate which cells will need to be attached in the marking places. For example, a net with 30mm mesh should be attached every 16 centimeters. This is a 1:3 fit, which involves fastening every third cell every 16 centimeters. The technology is as follows:
- Take a shuttle and attach a fishing line to it;
- The end of the line from the shuttle is tied to the outermost cell, and this outermost cell is tied to the picking cord;
- Then the shuttle is threaded through the calculated number of cells;
- At the mark on the cord, the cell is attached to the cord;
- Repeat the movements until all the cells are attached to the cord.
Here's a video of how to plant and tie knots:
The net will not perform its functions if it is not equipped with weights and floats. Without these elements, the network will sink to the bottom and lie there in the form of a shapeless and useless thing. Special cords can be used as such elements.

In this case, the design is somewhat simplified, and the time spent on this procedure is reduced.
Chinese networks
These cheap nets are widely popular among fishermen. They are really knitted in China, which cannot be said about Finnish networks, which are not always made in Finland. The cheapness of Chinese nets allows you to simply leave them if they get caught, and if they get damaged, you can throw them away without regretting it at all. They come in different lengths, sometimes allowing you to cover a large part of the reservoir. At the same time, they are not of good quality, since the Chinese save on everything. Questions arise very often. The Chinese can save on sinkers, and such a net is not able to submerge in water. Very often they use low-quality knots (simple ones), which can come undone during fishing. Knowing this, many fishermen, when buying Chinese nets, correct them, eliminating defects, after which they can be used for fishing. The Chinese use regular white fishing line to weave their nets.
Twisted mesh fabric
A very large contribution to the search for new materials for amateur and professional fishing was made by Japanese scientists who came up with a mesh made from twisted fishing line. Such canvases have unique qualities and are recognized throughout the world. A fishing line twisted from several individual fibers is called a multimonofilament thread. Such a thread can include from 3 to 12 separate, less thin threads. When purchasing such products, by looking at the inscription on the packaging, you can find out how many fibers are twisted into one thread. For example, if you see the inscription 0.17x3mm, then this indicates that 3 threads with a diameter of 0.17mm each are twisted into a single thread.
Mesh fabrics made from twisted fishing line have the following characteristics:
- Mesh fabrics have increased softness and elasticity;
- Unnoticeable in water;
- UV and salt water resistant;
- To knit them, a double knot is used;
- Nylon thread is used to tie them.
Landing net
A fishing net is a fairly serious structure that not everyone can weave and then “land.” But you can easily weave a landing net or cage from fishing line. For the landing net, a seamless “stocking” is knitted, which is then attached to a ring with a handle. Such a landing net is practically invisible in the water and does not alarm the fish when landing.

To weave a seamless network from which you can make a landing net, watch the video:
The Momoi Fishing company not only produces net fabrics, but also produces other accessories for fishing, and hand-knitting is used. Landing nets for landing fish of various sizes and designs are very popular among fishermen. All designs of this company are designed in such a way that they are easy to use, reliable and durable.
Any gear can be knitted from fishing line: nets, tops, etc. Their advantage is durability and lightness, and their invisibility in the water for fish makes them very catchy.
Most fishing gear is made of mesh material, knitted from threads, called del. Recently, parts made from synthetic materials have become widespread - nylon, perlon, nylon, etc. They are much more catchy, stronger and do not rot. To give fishing tools the required size and shape, the del is attached to a rope or cord. This requires thin cords and thick threads, the so-called landing threads. Threads are also needed for mending fishing gear, the same thickness as the thread from which the fishing gear is made. Most fishing gear is equipped with floats and weights to give them the desired position in the water. Floats are made from birch bark, wood, and foam. A birch bark float is a roll tightly rolled from strips of birch bark. A longitudinal hole is left in the middle of the roll through which a rope or cord is threaded. To prevent the roll from unrolling, it is steamed in boiling water. The size of the roll is determined by the type of fishing gear, as well as the possibility of making a float. Most often, the length of the roll is about 10 cm and the thickness is about 5 cm. Wooden floats can be in the form of turned cylinders, balls drilled through, but small smooth planks can also be used. To avoid cracking, wooden floats should be dried and painted with oil paint; The paint needs to be renewed periodically. Foam floats are made in various shapes: in the form of cylinders, plates and cubes. Large-pored floats can be puttied with a mixture of foam or fine wood sawdust and oil varnish. After drying, the floats must be sanded and painted with oil paint (nitro paint is not suitable, as it dissolves the foam). The hole in the float can be drilled or melted with a heated wire. Should sawdust and foam cuttings be dissolved in solvent? 647 to varnish consistency. Then you can use it to glue pieces of foam plastic together and make floats. Sinkers are used from baked clay, but pipe cuttings can also be tied up. You should not use stones or iron objects with sharp edges. For nets, wire rings are convenient as sinkers. All sinkers must have a smooth surface so as not to damage the fish and not to chafe the threads and ropes attaching them, so the edges of the pipe scraps must be processed with a file and sandpaper. Some fishing gear is made from local materials: twigs, reeds, shingles, birch bark, wire and metal mesh. The development of types of such fishing gear is of great economic importance.
Knitting details
Knowing how to knit by hand is necessary for repairing fishing gear, making some set traps and cuts (large-mesh walls) for three-wall nets.
A supply of thread is wound onto the shuttle (needle), wrapping it around the inner peg and the fork at its other end, and then again around the peg on the other side of the shuttle. The thread should not pass through its edge. You need a thin board-‘shelf’ 10-15 cm long and 2-3 mm thick. The width of the shelf should correspond to the size of the mesh. The edges of the shelf must be planed and sharpened, and the shelf must be sanded. Starting knitting, make a loop at the end of the thread wound on the shuttle, equal to the required mesh. To do this, the thread is passed around the shelf twice and, after tying, is removed. The resulting mesh is put on a nail or hook so that the knot is in the middle between the nail and the end of the mesh and on its left side. Then they take the shelf in their left hand, and draw the thread over the shelf placed at the edge of the cell. Having threaded the shuttle into the mesh, they pull the thread so that the edge of the shelf approaches the edge of the mesh. The edge of the mesh and the thread threaded into it are firmly pressed to the edge of the shelf with the index finger of the left hand. The shuttle is pulled to the left and, with a backward movement, a loop of thread is left over the stretched mesh. Then the shuttle is threaded from below into the left loop, drawing a thread around the mesh pressed to the shelf. Pulling out the thread, tighten the knot on the pressed mesh. The latter should tighten between the finger and the edge of the shelf. Having tied a mesh on the shelf, remove it and place the shelf under the edge of this mesh, passing the thread over the shelf, thread the shuttle from the bottom up into the mesh and, pulling the edge of the shelf to the end of this mesh, tie a knot on it in the same way as on the first mesh. In this way, they continue to connect the chain of cells to the required number. Then, loops are placed on a strong thread, or better yet, on a wire, so that a row of cells hanging from the wire is formed. The wire is tied into a ring and hung on a nail. The next row is tied to this row of cells in the same way as when tying cells in a chain. Without removing the resulting cell, repeat the same technique for the next cell and so continue until the last cell of the original row. After this, all the cells are removed from the shelf, and the process is repeated again. So, row by row, the length of the piece of delhi is increased. If you need to knit a piece of fabric with a decreasing width, then in certain rows of cells their number is reduced. To do this, thread the shuttle into two cells at once and tie one to them. If it is necessary to expand the connected part, then the shuttle is threaded 2 times into the same mesh, getting two meshes instead of one and increasing their number in one row or another (Fig. 4).
Cutting the cases
To cut a straight piece of del, count the required number of cells along the edge and mark this place by tying a thread or cutting the del. Starting to cut the part in the intended place, use scissors to cut two threads at once at the mesh knot, then again cut two threads at the next knot, etc. until the last mesh of the opposite edge of the part. It is enough to pull the large-mesh mesh fabric into a bundle, and if it is tensioned correctly, the nodes are arranged in rows. Then it is not difficult to cut the entire line in the space between the nodes at once. To cut a del obliquely, determine how many cells each row of cells should be reduced by. In accordance with this, it is necessary to cut along a certain number of cells alternately in the longitudinal and transverse directions. So, for example, if you need to cut a wedge of 100 cells on one edge and 25 cells on the other, then for every four cells cut in one direction, one cell should be cut in the other direction. The cross-cut of the factory cut cuts all the threads, and the extreme knots of the cut edge can be untied. The longitudinal cut of the factory cut destroys one thread, and the cells of the longitudinal edge of the cut, consisting of one whole thread, are not untied.
Connecting cases
A simple way of connecting - joining is done as follows. The pieces of delhi are hung by the outer meshes on a nail and, having pulled the edges of the pieces folded together, a shuttle is threaded 2 times into each pair of meshes of the folded edges, and after five to seven meshes a knot is made. The edges of the oblique cutting are sewn together by threading the shuttle not into the outer meshes, but stepping back from the edge by one or two meshes, since the obliquely cut part can come undone. More durable and accurate is the merging of the sections, in which the thread is tied alternately to the mesh of one and the other edge, as when knitting nets. The thread is taken of the same thickness as the pieces of thread being connected (Fig. 5).
By connecting pieces of partition of different lengths, distribute the amount of excess cells of one edge evenly over the cells of the other, connecting a cell of a short edge with two cells of a long edge. To do this, calculate how many cells connected in pairs through which two cells of a longer edge should be connected.
Preparing ropes and cords
To prevent the ends of the ropes from unraveling, it is better to put a ‘mark’ on the end of the rope - a thick, strong thread folded in a loop, and, pulling tightly, wrap the thread around the end of the rope together with the loop. Then you should thread the end of the thread into the loop and pull it under the winding, pulling the thread of the loop placed on the rope. The threads are then cut at the edge of the winding. The threads are connected using a clew or straight knot. New cords and ropes need to be ‘rejuvenated’, otherwise they will spin (ram), which is extremely undesirable for net cords. To do this, a cord or rope is pulled at one end in different directions over the grass or snow. Sometimes they limit themselves to tying the end of a rope or cord to a strong support, and wipe the rope or cord with a rag, squeezing and pulling tightly and moving from the tied end to the free one. Impregnating cotton cord with a solvent-foam varnish significantly reduces curling.
Landing of fishing gear
Fishing gear acquires its shape only when it is attached (planted) to ropes or cords. The fit can be different, for example, if a 150 m long del is placed on a 75 m long cord, then such a fit is called ‘1/2’. It is mostly used for networks. If the same piece of delhi is planted on 100 m of cord, then the planting is 1/3. This is how seines, traps and set traps are set. Planting is carried out as follows. Stretch a rope or cord between the supports at chest level and mark it at the required intervals. Having secured the end of the landing thread wound on the shuttle in the starting place and attaching the outermost mesh of a piece of thread here, a certain number of meshes are threaded onto the shuttle, and the thread is attached to the rope with a knot at the nearest mark. Then the same number of cells is threaded onto the thread again and the thread is attached to the rope with a knot at the next mark. In this case, the landing thread should not be pulled close to the rope, since during operation the latter will be pulled out and the thread may break. Usually they leave two or three fingers of slack at the landing thread. Wanting, for example, to plant a cell with a 30 mm cell by 1/3, the size of the gap is determined from the following calculation: the length of four cells in an elongated form will be 24 cm. To plant by 1/3, this distance is reduced by 8 cm, therefore, the gap will be 16 cm. The pieces of delhi are measured in an extended state (cord). Fitting designations 1/3, 1/2, etc. up to 1/15 indicate by what amount the length of the elongated piece of delhi is shortened when planting. The most commonly used landings are 1/2 and 1/3. The landing thread is attached to a rope or cord using a landing knot. Having strung the required number of cells on the thread, grab it with two fingers on the rope in the place opposite the mark, and do not tighten the thread, leaving it slack by two fingers. Pressing the thread to the rope, move the shuttle from above the rope away from you and then from below towards you, threading it between the thread and the rope. Holding the resulting turn of thread on the rope with your fingers, again draw the shuttle around the rope, on top of it away from you and under the rope towards you, and at the same time again thread the shuttle between the rope and the sagging loop of thread. Pulling the thread, tie a knot, making sure that both turns are pressed against each other (Fig. 6).
The ropes or cord stretched for work are marked at intervals, but it is advisable to stretch the marked cord next to the ropes. According to the marks, the landing is carried out on each newly stretched section of the rope, without outweighing the marked cord. It is more convenient to plant both edges at once, using one marked cord stretched between two ropes.
From the very beginnings of his existence, man has been obtaining food for himself. As a result, he learned and invented many ways to obtain food, including fishing. Over time, this activity has turned from a necessity into a hobby.
Fish are caught using a fishing rod and various contraptions. A very effective tackle is a net. Here we will look at how fishing nets are knitted manually and using a machine.
It should be noted that this did not come to its current form immediately. For a long time, water miners have been improving their fishing devices and have come to a common decision that the net should be made by weaving. The knitting technology for this gear has been clearly proven.
There are two ways to weave fishing nets:
- Manually.
- Mechanically, using a knitting machine.
Weaving fishing nets with your own hands
 Initially, the net was woven by hand. It took a lot of time and required perseverance and concentration. However, with some information and patience, it is quite possible to weave a network yourself at home. Personally made tackle will only be a joy.
First, you need to acquire a tool and decide what material the network will be made of. To do this, you can use either nylon thread or fishing line.
The choice of a suitable thread depends on the purpose of the net (what kind of fish it will mainly catch), its parameters (length, height and mesh size) and personal preferences.
You need to understand that nylon mesh("rag") stronger than forest, and therefore more durable. But such gear gets very tangled, and the process of extracting fish from it causes a lot of trouble. A network of scaffolding is easier to deploy, but breaks faster. A fast, strong fish can make a hole out of it and slip out to freedom.
The “rag” is used when catching species such as silver carp, bream, and large crucian carp is expected. These representatives of the ichthyofauna can easily damage a fishing line net, but if they get caught in a nylon fishing line, they will become thoroughly entangled in it and will not escape.
It is important to choose the correct thread section. Naturally, the thicker it is, the stronger the network. However, here you need to follow the rule of the golden mean. Tackle that is too thick is very noticeable (especially knots) and scares away fish, while gear that is too thin is easily damaged and does not hold the catch.
Tools and accessories
You will need a knitting shuttle and a template. You can make them yourself. The shuttle is made from a thin piece of aluminum or getinax. The thickness varies between 3-5 mm. One edge of the shuttle is pointed and has a slot in the form of a rod on which the thread will be wound. The other end looks like a bicorne that secures the thread.
The thread is wound as follows: A loop is knitted and placed on the rod at the top of the shuttle. Then the thread is pressed under tension to the lower edge, where the double horn prevents it from breaking, and the consumable material is wound, alternately turning the shuttle relative to the plane.
The amount of thread will depend on the length of the shuttle, the height of the rod and the depth of the double horn. As a rule, the dimensions of the shuttle are slightly larger than the size of the knitter's wrist.
The template is often made of plastic. It determines the size of the network cell and plays an important final role, so it must be done accurately and accurately. It is important that its edges are parallel and smooth.
A tourniquet will be useful to secure the beginning of the network, as well as a fixed support. As a rule, this is a gas pipe or battery. A thread is attached to it, from which the height of the net is gained, and then the finished tackle is knitted.
Knitting a knot
 The strongest and most immovable knot is performed as follows. A template is brought to the finished loop (the first one knitted by hand), and the shuttle is threaded into it.
The thread passed through the loop is attracted to the edge of the template (it should pass from above) and is fixed with the thumb. Now the shuttle can be moved freely.
There is a loop under your thumb that needs to be held until the knot is completed. Next, the shuttle is passed into the finished loop so that the thread wraps around the previous loop on both sides. Then the shuttle is passed a second time between the right edge of the loop and the already threaded thread.
After threading twice from top to bottom, the shuttle is passed into the loop, which is held by the thumb. The knot is tightened synchronously, i.e. the thread is pulled with a shuttle, and the pressure on the loop is simultaneously reduced with the thumb. A slight characteristic click will signal that the unit is ready.
Climb
These are the first steps that the knitter will use to set the specific height of the net. Using the knot shown above, a mesh is woven from a thread, consisting of cells adjacent to the same side. Their number will determine the height (or width) of the entire tackle.
After the first row is ready, take a tourniquet or thick rope and thread it through the individual cells (along one edge of the loops). Then the harness is tied to a pipe or battery and weaving begins in length.
Weaving
 The difference between this and the previous stage is that the template is applied to adjacent cells, and the finished ones are simply removed from it as they accumulate. It is necessary to ensure that the template is positioned perpendicular to the network, this affects its correct shape.
Next, the length of the tackle is woven in the same order. After the next row of cells is connected, a new one starts from the left edge. It is recommended to immerse the finished net in hot water (approximately 90 0 C) so that the knots are completely tightened.
The upper edge of the woven tackle is equipped with floats, and sinkers are attached to the lower edge.
Fishing net knitting machine
It takes a long time to weave a net manually, even with a lot of experience and skill. There is also a knitting method using special homemade equipment.
The machine for making fishing nets is made of five parts:
- Frame– made of aluminum tube;
- Shuttle– has a cut at an angle of 45 0 and a hole on the side for moving the thread (on the back wall there is a cone-shaped recess of 2.5 mm in which the bobbin is attached);
- Bobbin– a bronze product turned on a lathe, which moves freely in a shuttle;
- Aluminum plug– designed to fix the end of the bobbin (it is inserted tightly into the shuttle and should not fall out during knitting);
- Limiter shuttle movement.
Preparatory actions
The thread is wound onto the bobbin and inserted into the shuttle. Then it is closed with a stopper. Assemble the shuttle and install it, with the plug facing forward, into the machine body until it stops. The gap between the stopper and the hook is approximately 3 mm. The thread will pass through it while knitting.
Knitting nets
The mesh size of the future network is determined by the shuttle on which the thread is wound.  The cell includes the lower area of the machine. The thread enters under the shuttle and comes out from above.
Pressing the thread with your finger, pull it to the template and throw it in a half ring to the left. Then grab a couple of cells so that the thread passes from the bottom of the machine, and tighten the knot.
Each master can use his own technique or try different options. The most important thing here is that knots are knitted on a machine much faster than by hand.
Happy fishing!
Useful video
Video showing a simple and quick way to knit a fishing net:
Video about the best knots for weaving fishing nets:


